
Plugins are used to extend Oxwall’s social networking platform’s functionality. Oxwall allows to Install or Uninstall Plugins.
Oxwall provides an interface to update existing Plugins.
In this article, we will discuss how to update or add Plugins to Oxwall’s platform.
Step 1. Sign-in into Oxwall’s based social networking platform website as an administrator. Oxwall displays the “ADMIN AREA” page to allow the administrator to do administrative activities on Oxwall based platform website.
Step 2. Click on the “PLUGINS” icon. Oxwall will display the Plugins page to manage the Plugins.

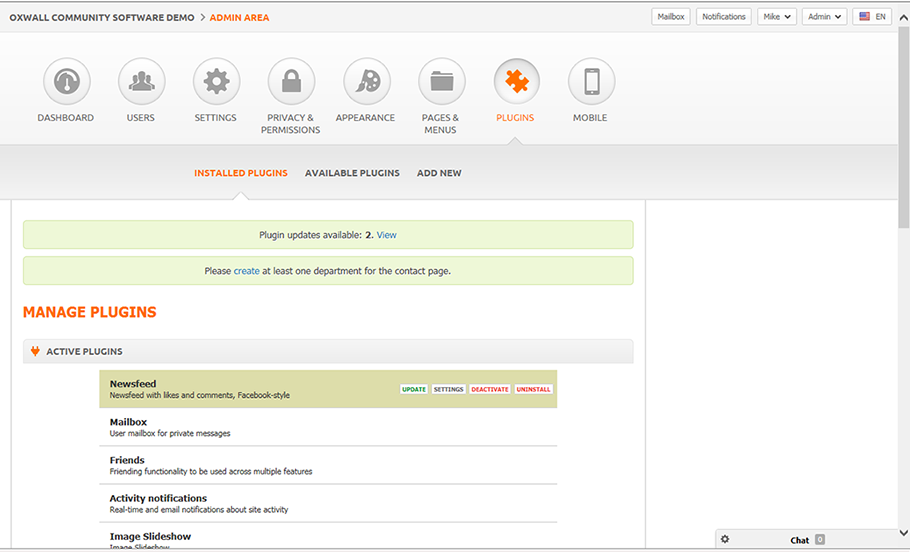
Step 3. Under the “INSTALLED PLUGINS” section, Oxwall displays all installed and active Plugins.
Step 3.1. Move the mouse over the Plugin, and click on “UNINSTALL” link to uninstall the selected Plugin.
Step 4. To install the Plugin, first, we need to check whether the Plugin is added into Oxwall or not. Added Plugins can be installed.
Step 4.1. Click on “AVAILABLE PLUGINS” link from “PLUGINS” page. Oxwall display the “AVAILABLE PLUGINS” page where it will display the list of available Plugins under “AVAILABLE PLUGINS” section.
Step 4.2. If the Plugin is available, move the mouse over the Plugin and click on “INSTALL” link. Oxwall will install the selected Plugin. After installation, you can manage the Plugin from Plugins page.
Step 4.3. If the Plugin is not available under “AVAILABLE PLUGINS” section, we need to add the Plugin files into Oxwall. Once we added the required Plugin files, Plugin will be shown under “AVAIALBLE PLUGINS” section. Once it is available we can install it as discussed in Step 4.2. Following steps will add the Plugin files into Oxwall based website:
Plugins can be added through Oxwall Platform’s interface or through Oxwall based website’s Control Panel. We will discuss both these steps below.
Step 4.3.1. Download the Plugin you want to add from Oxwall store. Usually the Plugins files are packaged in compressed format.
Step 4.3.2. Login into your Oxwall based website’s Control Panel.
OR
Click on “ADD NEW” link from Oxwall based website’s “Plugins” page. Oxwall will display “ADD NEW PLUGIN” page to allow you to add new Plugin.
Step 4.3.3. Open “File Manager” and navigate to “<your domain>/ow_plugins/” directory. This is the place where Oxwall keeps all its Plugins. Observe that each Plugin will be stored in its own directory or folder. For example: for “blogs” Plugin files will store under “<your domain name>/ow_plugins/blogs/” directory.
The Plugin files you are going to add should be in its own directory.
OR
Click on “Browse…” button to select the Plugin you downloaded.
Step 4.3.4. Upload the Plugin file(s) and make sure the files are into Plugin’s own directory. For example for “sample” Plugin, you should upload or extract the files into “<your domain>/ow_plugins/sample/” directory.
OR
Click on “UPLOAD” button to upload the Plugin. Oxwall will ask for FTP details to upload the Plugin into your Oxwall based website. Provide the details and click on “ENTER” button to upload the Plugin.
Step 4.4. Once the Plugin files are upload, the Plugin will be shown in “AVAIALBLE PLUGINS” section. Now we can Install the Plugin.
Open your website and check whether your Plugins are installed or uninstalled. If you are able to access the Plugin’s functionality; the Plugin is installed successfully and active.
<Mourya>