
Continuation to our previous Article, “VMWare Workstation 12 : Create Virtual Machine and Install CentOS 7 (Part 1)“, I am writing this, Part 2, to explain how to Install CentOS 7 64-bit Operating System. I will continue from where we stopped in Par 1 of this Article; where we have created a new Virtual Machine.
Step 1 to Step 8 were covered in Part 1 (link mentioned above) of this Article.
Step 9. Once you see the message “Press the <ENTER> key to begin the installation process.” message, press the <ENTER> key on Keyboard. This will start Checking the media process before installing the Operating System. Once the checking process is done, CentOS 7 installation process will start and you will see the “WELCOME TO CENTOS 7.” dialog.
Step 10. Select the language you like to use during the installation process, by selecting respective language entries which are displayed under the “What language would you like to use during the installation process?” field.
I have selected the English language.

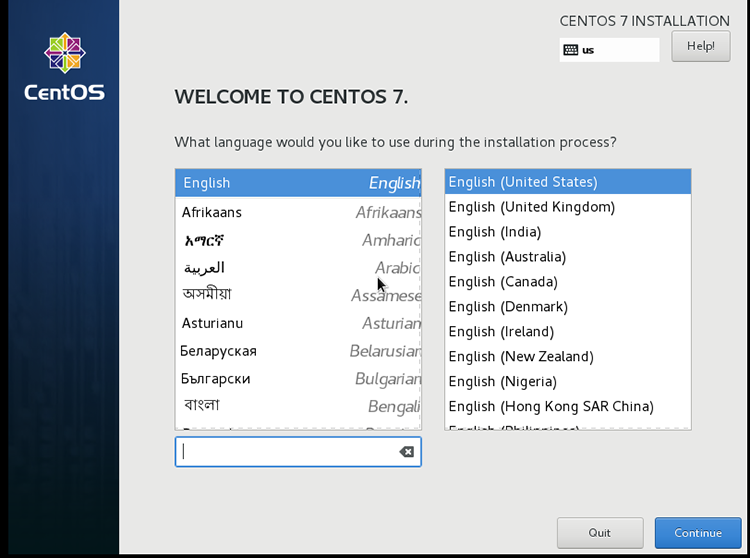
Once selection is done, click on Continue to select other settings, which are part of the installation process.

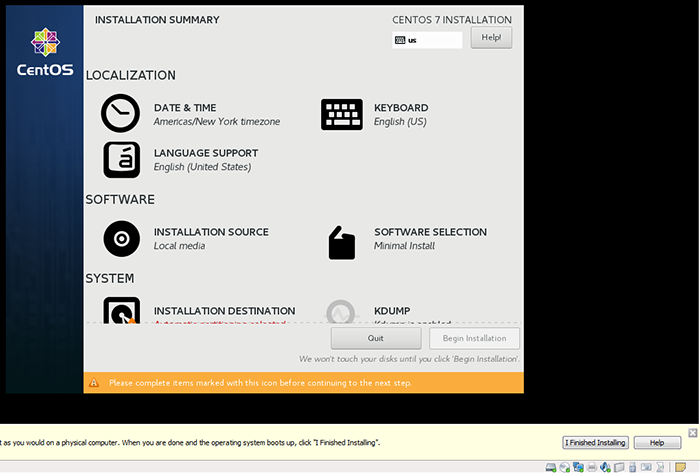
Step 11. Change the below LOCALIZATION settings: Or you can keep the default entries.
Step 11.1. DATE & TIME – To select the Region, City, Date & Time. You can select the time format as “24-hour” or “AM/PM” format. Note that to select the Network time; it automatically fetches the Date & Time details from NTP – interNet Time Protocol; you need to connect to the networking first. To connect to the network; you need to do the setting in “NETWORK & HOST NAME” under SYSTEM.
Step 11.2. KEYBOARD – To select the keyboard layout.
Step 11. 3. LANGUAGE SUPPORT – To select additional languages support to be installed.
Step 12. Select Software to be installed from SOFTWARE section:
Step 12.1. INSTALLATION SOURCE – Select the installation media where the installation media exists. By selecting “Auto-detected installation media:”, VMWare automatically selects the installation media. And you can verify whether the media is good to install from, by clicking Verify button.
You can also provide the additional resources from where the installation files exist, by adding repositories in the “Additional repositories” section.
Note that, to use the media from the Internet, you need to connect to the network.
Step 12.2. SOFTWARE SELECTION – Select the environment to set up from the “Base Environment” list. And select, respective Add-Ons for the selected environment.
Select the environment & the Add-Ons based on your requirement. If you are looking for a Server installation, select the environment suitable for the Server setup. If you are looking for Desktop installation, select the Desktop environment.
I have selected “Development and Creative Workstation” to set up the Development workstation & the Add-Ons to support the development environment.
Once the selection is done, it looks for dependencies for the selected components; and also selects automatically the dependent components for the installation.
Step 13. Select System settings from SYSTEM:
Step 13.1. INSTALLATION DESTINATION – Select the device(s) you would like to install. By default, it selects the local standard disk, what you have initially provided before beginning the installation.
You can also add additional disks from “Specialized & Network Disks” by clicking the “Add a disk…” button.
By default, the “Automatically configure partitioning.” option is selected for Partitioning under Other Storage Options. Keep the default selected values.
Step 13.2. KDUMP – Enable / Disable the kernel crash dumping mechanism. In the event of a system crash, kdump will capture this information for future reference to let know us the cause of the system crash. By default, some amount of memory is allocated to store the crash dump. We can keep the default values.
Step 13.3. NETWORK & HOST NAME – Connect to the Network by enabling the “Ethernet” option. This is not necessary unless you specify any options where the Internet is required. For example, if you have selected the NTP option to get the date & time; Network should be enabled.
Also give the proper name to the hostname in the “Host Name:” field. By default, it will be “localhost.localdomain” and after you change to your own hostname, click on Apply button to change the hostname.
Step 13.4. SECURITY POLICY – Select the security policy by selecting the profile from the profiles list and then click on the “Select profile” button. Your System security settings are changed based on the selected security policy. I didn’t select any security policy for my installation.
Step 14. Once all these settings are done, the “Begin Installation” button will be enabled. Click on it, to start the installation process. CentOS 7 will installation the process, will open the CONFIGURATION window to allow the user to create ROOT PASSWORD & USER CREATION under USER SETTINGS.
Step 14.1. ROOT PASSWORD – Provide the root password in the “Root Password:” field & enter the same password in the “Confirm:” field to confirm the root password.
“root” account is used to administer the System.
Step 14.2. USER CREATION – Create a user; other than the root user for common tasks to do in the System. Provide the Full name & User name details.
It is recommended to set the password to the User. Select the “Require a password to use this account” option to provide the password. Enter the password in the “Password” field & confirm it in the “Confirm password” field.
Step 15. Observe that, installation process started and see the components installed on the System, with progress, displayed on the CONFIGURATION window. It will take some time to complete the installation process. Ensure that, your System is connected to the Power & ensure no disruptions during the installation process.
Step 16. Once the installation is done, it performs the post-installation setup tasks. After completion of post-installation setup tasks, the installation will be completed and it will show the below message, on the CONFIGURATION window:
Complete!
Cent OS is now successfully installed and ready for you to use!
Go ahead and reboot to start using it!
[Reboot]
Click on the Reboot button to reboot the System (Virtual Machine).
Step 17. Once the System (Virtual Machine) is re-started, select “CentOS Linux (3.10.0-862.e17.x86_64) 7 (Core)” to start the OS. OS will start and display the INITIAL SETUP window to complete the configuration setup.

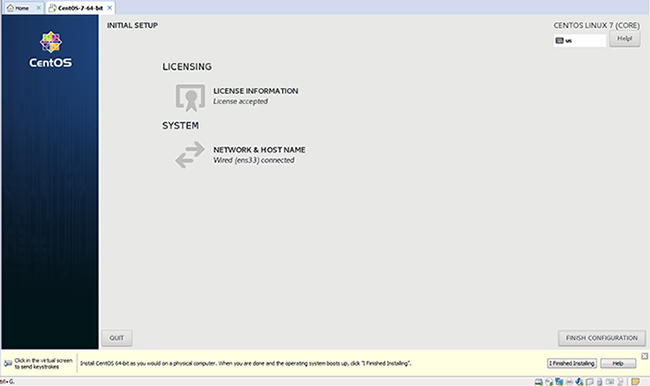
Step 17.1. LICENSING – LICENSE INFORMATION – Select the “I accept the license agreement.” checkbox to Accept the License Agreement.
Step 17.2. SYSTEM – NETWORK & HOST NAME – Network & Hostname details are already provided in the above step, “Step 13.3.”. The same details will be displayed here.
Once the selection is done, click on the FINISH CONFIGURATION button to complete the configuration. And it will show the log-in screen to allow you to log in to the System.
And also you can click on the “I Finished Installing” button on the bottom of the Virtual Machine. If it is not appearing in your installation; not an issue; skip it.
Step 18. From the log-in screen, provide the password of the User and click on the Sign In button to log in to the Operating System. If the entered password is correct, you are now logged into the System. As this is the first time log-in; GNome’s initial setup will start to set up the GUI.
Step 18.1. Select the language from the list of languages. I have selected “English United States” for my installation.
Click on the Next button to select the keyboard layout.
Step 18.2. Select English (US) keyboard layout. Click on the Next button to go to the next setup.
Step 18.3. Enable / Disable the Location Services; allows applications to get your location. Click on the Next button to go to Online Accounts screen.
Step 18.4. From the Online Accounts screen, connect to the online accounts or click on the Skip button to skip the step now.
Now you are ready to go! Click on Start using CentOS Linux button to start using the Operating System. Getting Started GNOME Help window will start to go through with Getting Started videos/help.
I hope you liked these Part 1 & Part 2 Articles; explaining the Virtual Machine creation and installing CentOS 7 on it.
Please submit the feedback through below Comments section.
🙂 Sahida