
Windows Task Scheduler is useful to schedule the Tasks to perform required Actions. Task Scheduler also allows to schedule the Task to RUN when a particular EVENT is logged. In this article, I am going to explain to Create Basic Task using Task Scheduler and it displays a simple message whenever it is triggered.
Step 1. Go to Control Panel and open Administrative Tools.
OR
you can type below path in the Explorer window:
Control Panel\All Control Panel Items\Administrative Tools
Windows 7 will open, Administrative Tools.
Step 2. Look for Task Scheduler and double click on it. A Task Scheduler window will open; to allow us to manage the tasks.
Step 3. Once the Task Scheduler window is opened, click on the Action menu and then select the “Create Basic Task…” menu item.
OR you can click on the “Create Basic Task…” item from the Action pane to start creating the basic task. If you are not seeing the Action pane; click on the “Show/Hide Action Pane” toolbar button from the Toolbar. This will show or hide the Action pane.

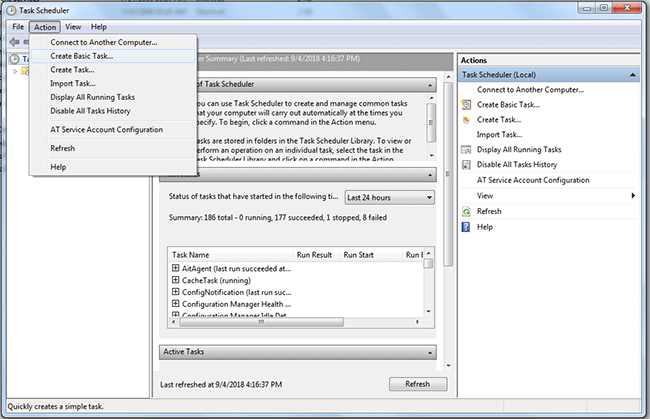
Task Scheduler will open, “Create a Basic Task” wizard in the “Create Basic Task Wizard” window.
Step 4. From the “Create a Basic Task” wizard, enter the name of the Task in the “Name:” field and enter the description of the Task into the “Description:” field.
I have entered “SampleTask” as the Task Name.
Then click on the Next button to select Task Trigger options.
Step 5. From the “Task Wizard” wizard, select the option, when you want the task to start or Trigger. You can select the option Daily, Weekly, etc, from the list of options.
I have selected the “Daily” option for our SampleTask. That means, this task will Trigger on a Daily basis. So what time it will Trigger.? We need to set this in the next wizard.

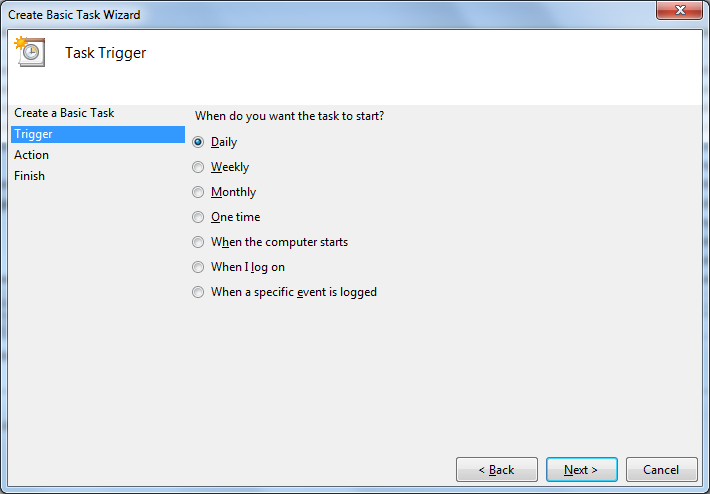
Click on the Next button to go to the “Daily” wizard. Note that, this wizard and the options will change depending on the options you selected on the “Task Trigger” wizard.
Step 6. From the “Daily” wizard, select the date & time from when you want to Trigger the Job. From the “Start:” field, select data & time. If you want to Trigger the Job every day, you enter the value “1” in the “Recur every:” field. For example, If you want to execute the job on alternative days; enter the value “2”.
Click on the Next button to move to the next wizard.
Step 7. We set when to Trigger the Task. Now we need to set, what needs to happen (action) when the Task is triggered.
From the “Action” wizard, we need to select the action to perform when the task is triggered. I have selected the “Display a message” action; to display a message on the screen, when the Task is triggered.
Click on the Next button to move to the next wizard.
Step 8. From the “Display a Message” wizard, enter the title of the message box in the “Title:” field and enter the message description in the “Message:” field. This message is going to be displayed when the Task is triggered.
Click on the Next button to go finish the wizard.
Step 9. From the “Finish” wizard, select the “Open the Properties dialog for this task when I click Finish” option, to open the Properties dialog for this task. This allows us to re-check and modify any other properties for the Task.
Then click on the Finish button. Windows will create the Task and you can see the Task from the Task Scheduler window.
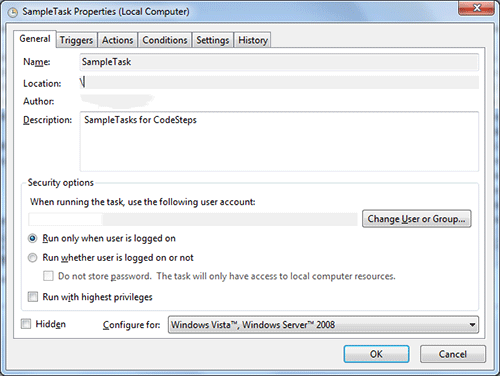
Task Scheduler opens the Properties dialog to allow us to modify the Task details.
Step 10. From the Task Properties dialog, observe that Task has been created in the location “\” – Root location. Also, observe that; the Task was set to Run only when the user is logged in to the System. You can set whatever options you want; from the Properties dialog. Click on the OK button once done.

Step 11. In the middle pane of the Task Scheduler window, you will find our sample task “SampleTask” and observe that the status of the Task is “Ready”. That means the task is ready to execute; when the Trigger options are satisfied. We set out tasks to execute Daily at a particular time. But how do test, whether the Task is working fine or NOT? The next step explains this.
Step 12. Select out “SampleTask” and right-click on it. Task Scheduler will open a context menu to allow us to manage the Task. Click on the Run menu item, to Test whether the Task is working.
OR
Click on the Run item under Selected Item from Actions pane.

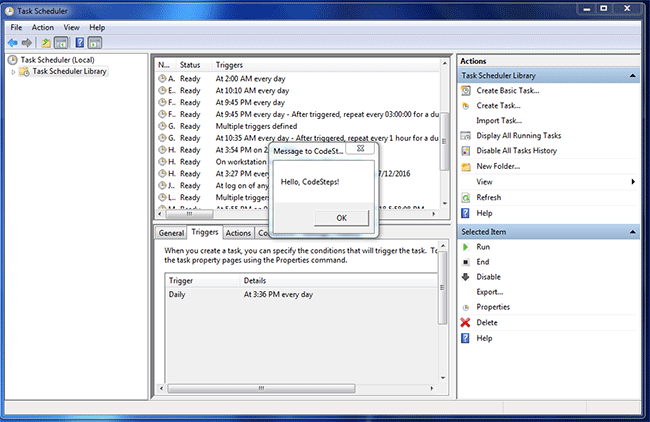
Observe that our Task displayed the message on the screen. Good news! Our Task is working as expected.
If you like this article, please give feedback.
🙂 Sahida