
We have discussed Core Components in Android in my previous Article “Android Programming – Core Components“. In this article, we will discuss Adding a Button to the Activity and adding a Button handler to display the “Hello, World!” text.
Step 1. Create an Android Project.
While creating the Project; in the “Add an Activity to Mobile” wizard; select “Add No Activity”.
Step 2. Once the Project is created, Android Studio will start to build the Project. Once the Project Build is completed; when you attempt to Run the Project; you will see the below Error message; as NO Default Activity is added to the Project:
Error running ‘app’:
Default Activity not found
Step 3. Now we will add an Activity to Project. Add an Empty Activity to the Project. Refer to this Article to learn how to add an Activity “Android Studio – LoginActivity – Add Login Activity to Android Project“.
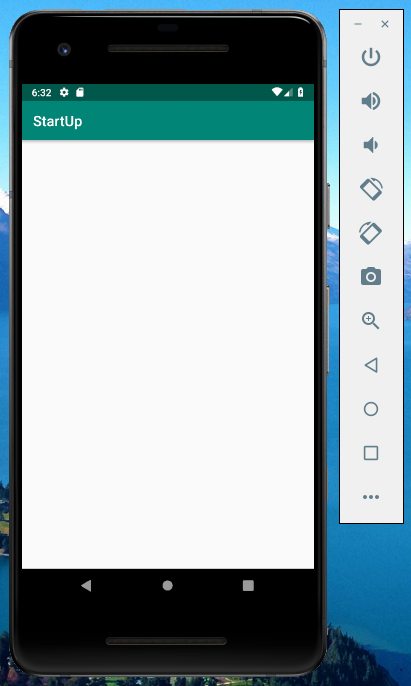
Once the Activity is added; Build & Run the Project. You will see the blank screen; once your Project is opened in the Emulator.

What to do now is; add a Button to the Activity and then press the button; will display the “Hello, World!” message.
Add a Button to the Activity
Step 4. Open the “activity_main.xml” file. You can see this file in Android view under app -> res -> layout.

Step 4.1. Select the Design View and select the appropriate device for preview from the “Device for Preview (D)” field; which is on the top of the Design View.
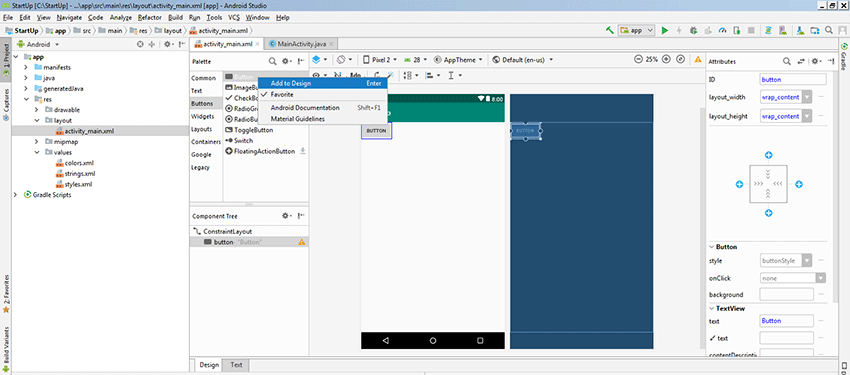
Step 4.2. To add the Button control; select Buttons. Android Studio will display a list of Button controls. Select Button control and right-click on it. And then select the “Add to Design” menu item. Android Studio will add a Button control to the Design window. You will see the text BUTTON appear on the Button control. We will change this to “Hello!”.
Add a string resource
Step 4.3. Observe that, after adding Button control to the Design; you will see one entry appearing under the Component Tree panel; under ConstraintLayout. And also observe that there is a Warning icon that appeared next to it. To show the Warning message; click on the “Show Warnings and Error (E)” icon, which is top right of the Design pane. Once you click it; it will show the below Warning message:
Hardcoded string “Button”, should use
@stringresourceHardcoding text attributes directly in layout files is bad for several reasons:
* When creating configuration variations (for example for landscape or portrait) you have to repeat the actual text (and keep it up to date when making changes)
* The application cannot be translated to other languages by just adding new translations for existing string resources.
There are quickfixes to automatically extract this hardcoded string into a resource lookup.Issue id: HardcodedText
And also you will see the Suggested Fix. Click on Fix button.
Android Studio will display the “Extract Resource” dialog. Keep the default values shown; click on the OK button to add the string resource.

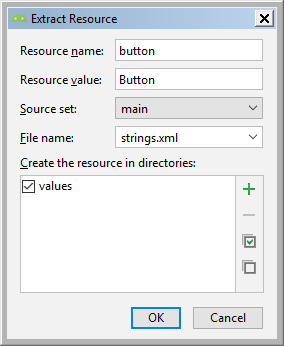
Step 4.4. Observe that, in the “strings.xml” file; the Button string was added.
<resources>
    <string name="app_name">StartUp</string>
    <string name="button">Button</string>
</resources>
Change the Button text “Button” to “Hello!”.
Add a button click handler
Step 5. Now we have a button added to the Design. Now we need to add a button click handler; which will run when we click the button.
Step 5.1. Select the Button control in the Design and it will show the properties of the Button.
In the Attributes pane, under Button, you will see the onClick property. Place the mouse over it, and Android Studio will show the below ToolTip:
@android:onClick: Name of the method in this View’s context to invoke when the view is clicked. This name must correspond to a public method that takes exactly one parameter of type View. For instance, if you specify android:onClick=”sayHello”, you must declare a public void sayHello(View v) method of your context (typically, your Activity).
Step 5.2. As mentioned in the ToolTip above; we will add a method to run when we click the button. Where to add this method? This must be associated with the Activity. We have added MainActivity to the Project; so, we have MainActivity class has been created.
Open the MacinActivity.java file; which is under app -> java -> com.codesteps.david.startup in Android view.
Step 5.3. Add the below method to MainActivity class:
public void sayHello(View v) {
    // Add relevant code here.
}
Step 5.4. How does Android know to run this method; when we click on the button? We need to map it. In the Design view, select the Button control. From the Properties pane, enter sayHello in Button’s onClick field. After adding this; the “activity_main.xml” file looks like below:
<?xml version="1.0" encoding="utf-8"?>
<android.support.constraint.ConstraintLayout xmlns:android="http://schemas.android.com/apk/res/android"
    xmlns:app="http://schemas.android.com/apk/res-auto"
    xmlns:tools="http://schemas.android.com/tools"
    android:layout_width="match_parent"
    android:layout_height="match_parent"
    tools:context=".MainActivity">

    <Button
        android:id="@+id/button"
        android:layout_width="wrap_content"
        android:layout_height="wrap_content"
        android:onClick="sayHello"
        android:text="@string/button" />
</android.support.constraint.ConstraintLayout>
Observe that, “sayHello” was mapped to the onClick event.
Add code in the Button handler to show the “Hello, World!” message
Step 6. Inside the “sayHello” method which we added just now in MainActivity class; add the below statement.
Toast.makeText(this, "Hello, World!", Toast.LENGTH_SHORT).show();
This will create the Toast object; prepare the text “Hello, World!” and display it on the Activity window by calling its’ show() method. I am not going to explain Toast in this Article; but remember that, Toasts are useful to show pop-up messages to notify the user when required.
After adding this, the MainActivity.java file looks like the below:
package com.codesteps.david.startup;

import android.support.v7.app.AppCompatActivity;
import android.os.Bundle;
import android.view.View;
import android.widget.Toast;

public class MainActivity extends AppCompatActivity {

    @Override
    protected void onCreate(Bundle savedInstanceState) {
        super.onCreate(savedInstanceState);
        setContentView(R.layout.activity_main);
    }

    public void sayHello(View v) {
        Toast.makeText(this, "Hello, World!", Toast.LENGTH_SHORT).show();
    }
}
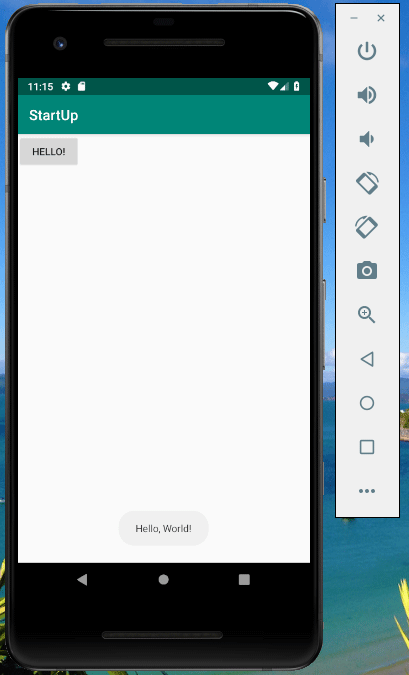
Step 7. Now Build & Run the Project. You will see the “Hello!” button appeared in the Emulator. Click on the button and you will observe, the “Hello, World!” message that popped up on the screen.

We discuss more Android through upcoming Articles.
[..] David
One thought on “Android Programming – Create an Activity and Add a Button handler”