
We have discussed WCF in our previous Article “WCF – Introduction“. Now through this article, we will discuss creating a WCF Service Application and testing it with WCF Test Client.
Lets’ start creating our first WCF Service Application.
Create WCF Service Application
Step 1. Open Visual Studio. Click on File menu -> select New menu-item -> and then select “Project…” menu item.
OR simply press Ctrl + N key combination from the keyboard.
Visual Studio will open the “New Project” dialog to allow you to create a new project using Visual Studio.
Step 2. From the “New Project” dialog; select the “WCF Service Application” template to create our first WCF Service Application. This is under the “Templates -> Other Languages -> Visual C# -> WCF” tree path which is displayed in the left pane in the dialog.
Give appropriate values in “Name:“, “Location:“, “Solution:” and “Solution name:” fields.
I have entered “WcfServiceApp” in the “Name:” field.
Once the changes are done, click on the OK button to create the WCF Project.
Step 3. Once the project is created, go to Solution Explorer and observe below files were added to the Project.
IService1.cs -> This is an interface file contains the interface details; the details of the service operations the interface provides. As this is the interface, the interface definition must be implemented and this will be in Service1.svc.cs.
Service1.svc.cs -> This is the definition of the service. The implementations of the methods of the Service are added in this file.
Web.config -> This is the application configuration file contains Application specific setting, Application behaviors etc,.
Test WCF Service Application
Step 4. Lets’ try to Build & Run our Application. Note that, this is NOT a standard, Windows Application; it is a Service Application. This means this Application provides services to other Applications. How do we Run this then? We need a Client Application to access the Services providing this Service Application.
Fortunately, Visual Studio provides a Test Client to Verify this. We verify the Services with this Test Client.
Step 5. To open the WCF Test Client, select the “Service1.svc” file from Solution Explorer and Run the Application. Visual Studio will open “WCF Test Client” where we can test our Service Application.
Step 6. From WCF Test Client, observe that; it has displayed the methods (services) of our Service Application to enable the Clients to access. As our Application is providing GetData() and GetDataUsingDataContract() methods; these are displayed in the Test Client.
In order to test them, just double-click on the methods. For example, upon double-clicking; GetData() method; the Client Application displays, the details of the method in the right pane. This method takes one argument, value; enter the value and press on Invoke button to call the GetData() method from our Service Application.

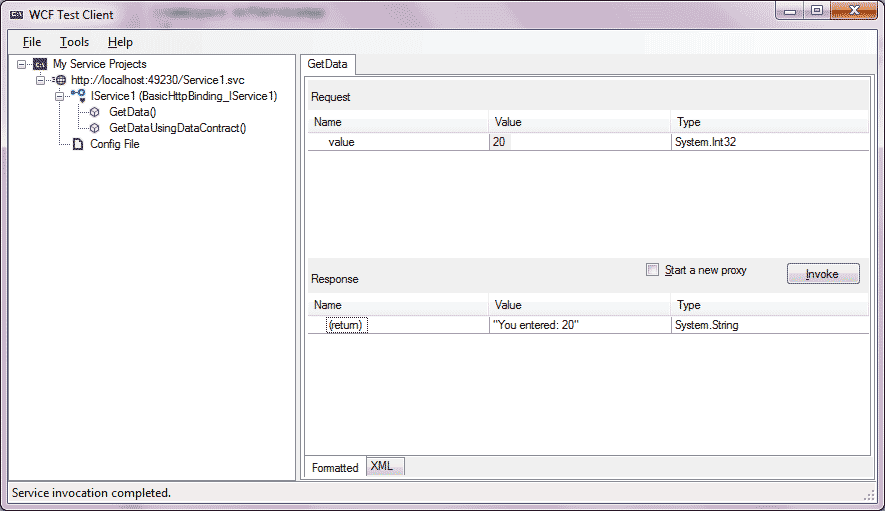
The results are displayed in the Response box.
Note that, the communication between the Client and the Service Application is through XML. Click on the XML tab in the WCF Test Client Application to see, the request and response details in XML format.
This way we can develop and Invoke the methods from WCF Service Application.
We discuss more on WCF through upcoming Articles.
| Andy