
C# allows us to create the controls dynamically, and place them on Windows Forms. Through this article, we are going to create a Button control dynamically. I recommend you to read the “C# – How to use Button control?” article before continuing to read this article.
Create a Button
Step 1. The Button class is used to create Button control. Our first step is, to create an instance of the Button class. Assuming you already created the Windows Forms project in Visual Studio IDE. 🙂
Button dynamicButton = new Button();
Step 2. We need to display the text on the Button and the control should be visible on the Form. Below are the properties of theButton control, to set this for us.
dynamicButton.Text = "Dynamic";
dynamicButton.Visible = true;
Step 3. Now, we have our Button control created dynamically. Let’s see whether we see it, when we RUN our Program. Run the program, and observe that, our Button control is not visible on Windows Form. Why?
This is because we need to attach our control to the Form to display on it. Our control was created successfully; it is in the memory; but, to display it on the Windows Form, we need to add our control to the Form.
Attach Button to the Form
Step 4. Form class represents Windows Form. Whenever we place or add a control to the Form; it maintains a collection to keep the controls and using this collection, it displays all the controls on its display area. Hence, we see the controls on the Form.
Now, we need to add our control to Form’s collection. As mentioned above, the Form class represents Windows Form; and it has Controls the property to hold the list of controls attached to the Form. We use this property to add our control to the Form. The below code will do this, and this has to be in our Form’s class. Remember that, our Form’s class (example; Form1) is derived from the Form class.
this.Controls.Add(dynamicButton);
Step 5. Now, again RUN the program; observe that, our Button control was displayed on the Form. But, it was displayed at (0, 0) location on the Form. We can place the Button, in the specified position on the Form, by using its Location property.
buttonDynamic.Location = new Point(12, 12);
Add an event handler
Step 6. After running the program, once the Application window is opened, Click on our Button control. You see nothing happened. Right? Because we need to add an event handler to it. Event handlers execute when an event occurred.
Button control will generate Click event, when we click on it. As it doesn’t have an event handler attached to it; we do not see anything happen, when we click on it.
We need to create our event handler and attach it, to the Click event of the Button control. += operator is used to attaching the event handler to the Click event. When we use += operator, Visual Studio will automatically give us the option to create an event handler for us.
If your Visual Studio version is not showing the option to create the event handler; you can use the below code. Remember that, this method must match the signature of EventHandler delegate.
buttonDynamic.Click += ButtonDynamic_Click;
And the event handler code is;
private void ButtonDynamic_Click(object sender, EventArgs e)

        {
    throw new NotImplementedException();

        }
Observe that, inside the event handler code, Visual Studio added code to throw an exception. Because it is to ensure to replace this code with our own code.
Replace the throw statement with the below code; to display a message box when we click on the Button control.
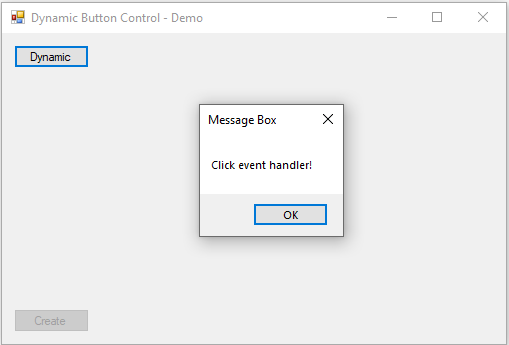
MessageBox.Show("Click event handler!", "Message Box", MessageBoxButtons.OK);
Step 7. Now, RUN the program and observe that when we click on the Button control, it will display the Message Box.
Complete working code
Here is the complete code; this shows a Windows Form with the “Create” button on it. Once click on the “Create” button, it will add a “Dynamic” button at the location (12, 12) on the Form. Also observe that the “Create” button will be disabled, once we click on it to avoid creating multiple dynamic button controls. When clicking on the “Dynamic” button, it will display the message box.
Screenshot of the Application window looks like below;

We will discuss more topics in our upcoming Articles. Do not forget to give your feedback through the below Comments section.
(Raju)
This is useful
Useful article. Thank you. I like the way you explain the topic, neatly.