
Through the series of articles; so far, we discussed about an overview of Spring Boot and setting up a development environment to build the applications. Now, we are going to discuss, creating a web application using Maven; a simple Spring Boot working example.
Create a web application using Maven
Maven provides us with better options to create a web project from command prompt. We use Maven’s Archetype plugin to create our web project. Archetype is a template toolkit which contains the project prototype we wish to create.
Below is the syntax we use to create a Maven project by using it’s archetype:generate goal.
mvn archetype:generate
-DgroupId= Packaging name
-DartifactId= Application name
-DarchetypeArtifactId= Maven template
-DinteractiveMode=false
So, as we already installed Maven in our System; now, we are going to create Maven web project using above command syntax from command line;
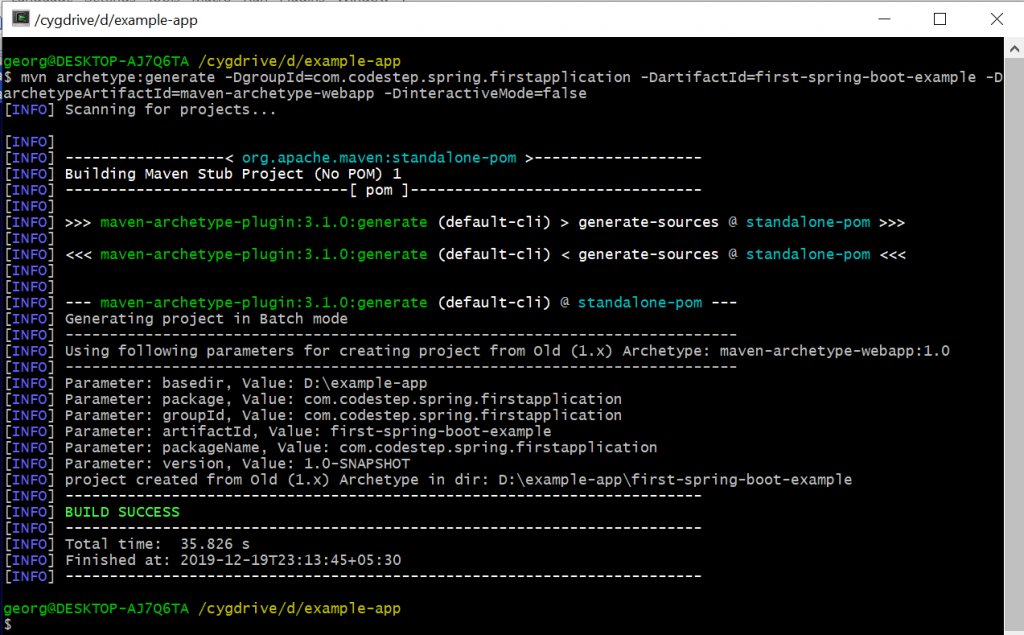
mvn archetype:generate -DgroupId=com.codestep.spring.firstapplication -DartifactId=first-spring-boot-example -DarchetypeArtifactId=maven-archetype-webapp -DinteractiveMode=false
Once we run the above command, the result shows like below; please note that, it will take some time to download necessary files when you run this command, if the required files are not installed already;

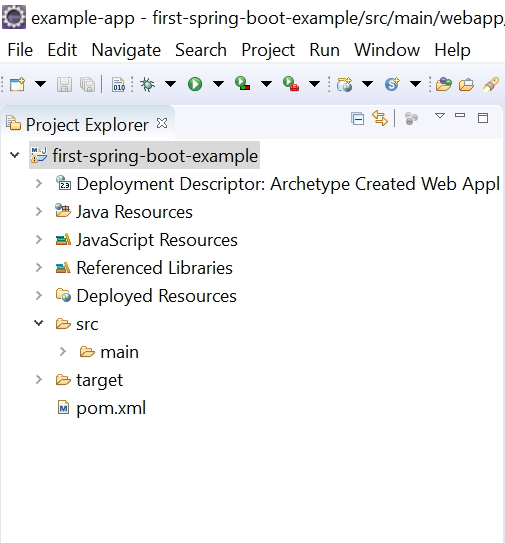
Now, we have our sample Project, first-spring-boot-example is ready. Now it’s time to open it in one of the editor, Eclipse; and import our maven project into it.
Since it is a maven project; please edit, source directory as src.main.java in build-path.
The Project structure looks like below; in Eclipse editor;

Don’t think that, we are done with our Project. Lot more to add to this Project, to complete it. Next step is, add the necessary dependencies. Yes, dependencies should be added to the Project, in order to complete and successful project execution.
Add Spring Boot Dependencies
Spring Boot provides multiple starters, makes our life easy to develop applications. To use the benefits of these starters, we need to use them in our pom.xml file, which is a Project Object Model file contains Maven project details and configuration information.
Adding Spring Boot Starter Parent dependency
As maven provides an inheritance for dependencies, here we are going to inherit spring-boot-starter-parent dependency for getting default spring boot facilities. This dependency enables the below features;
- Sources are encoded to UTF-8
- Default compiler level will be java 1.8
- Version management
- Resource filtering and plugin configuration.
So, to inherit our project from spring-boot-starter-parent, you need to add below configuration into our pom.xml file.
<parent>
<groupId>org.springframework.boot</groupId>
<artifactId>spring-boot-starter-parent</artifactId>
<version>2.2.2.RELEASE</version>
</parent>
Adding Spring Boot Starter Web dependency
This is used for building web applications. We can also create RESTful applications using this starter. It uses Tomcat as an embedded server by default. To add this starter, we need to add below code in our pom.xml file;
<dependency>
<groupId>org.springframework.boot</groupId>
<artifactId>spring-boot-starter-web</artifactId>
</dependency>
So far, we have added Spring Boot dependencies to our Project, in pom.xml file. What else left? We need to write our Java application and build the project. To build the project, we use Spring Boot Maven plugin, which is useful to package our project to an executable JAR.
Spring Boot Maven Plugin
Maven is now providing plugin for spring boot projects. By using this plugin we can package our projects to executable jar and deploy-able war file. Spring boot plugin has below goals for making our work easier,
-
- mvn spring-boot:run (To start the spring boot application)
- mvn spring-boot:run (To stop the spring boot application)
- mvn spring-boot:repackage (To make executable jar/war)
So, to use above features , please add below code in your pom.xml file.
(Note: Here we are giving our main Class Name, i.e application.MyApplication, we will look more about this later)
So, the complete pom.xml file, looks like below;
After adding all dependencies, run below command, from the command prompt.
mvn eclipse:eclipse
This command, read the pom.xml file, creates a perfect Eclipse project you can open it in Eclipse IDE.
Create a RESTful web application
Our project configuration setup is completed; now it is ready to develop our web application. What we will do is; create a simple Spring Boot web application that has the fields user id, user name and contact no. When we add each user, it will save the data and return the total records saved value.
Here is our sample web application;
Spring main application class
As like java standalone application, spring boot starts from spring main application class. Usually we use @SpringBootApplication annotation on top of the main class to enable component scan and enable auto configuration features.
Our application class looks like below;
// MyApplication.java

package application;

import org.springframework.boot.SpringApplication;
import org.springframework.boot.autoconfigure.SpringBootApplication;

@SpringBootApplication
public class MyApplication {
	public static void main(String[] args) {
        	SpringApplication.run(MyApplication.class, args);
	}
}
Now, we have the main application class ready. We need to add this class into our pom.xml file, to start the application with the help of spring boot plugin.
Spring Rest Controller
Restful controller is used to handle all web requests. By adding @RestController annotation, it will listen to each web request based on the request mapping. In our Example, we have “/user” mapping in a class level and “/add” in a method level, as follows;
// MyUserController.java

package application.controller;

import java.util.HashMap;
import java.util.Map;
import org.springframework.web.bind.annotation.GetMapping;
import org.springframework.web.bind.annotation.RequestMapping;
import org.springframework.web.bind.annotation.RequestParam;
import org.springframework.web.bind.annotation.RestController;
import application.model.User;
import application.service.MyUserService;

@RestController
@RequestMapping("/user")
public class MyUserController {
	private final MyUserService service = MyUserService.getInstance();

	@GetMapping("/add")
	public Map<String, Object> addUser(@RequestParam String userId, @RequestParam String userName, @RequestParam String userMobileNo) {
		User user = new User();

		user.setUserId(userId);
		user.setUserName(userName);
		user.setUserMobileNo(userMobileNo);

		Map<String, User> resultData = service.addUser(user);
		Map<String,Object> response = new HashMap<String, Object>();

		response.put("Total Data", resultData);

		return response;
	}
}
Here userId, userName and userMobileNo will be taken from client side as input values; and we have, our REST service to process these input values; and these values (as a record) will be added to the old records and will send back to the client.
REST Service and Model class
Our REST service is used to add input values with previous values and return the whole set to the client application. Model class is to represent a data model, as follows;
// MyUserService.java

package application.service;

import java.util.HashMap;
import java.util.Map;
import java.util.Objects;
import application.model.User;

public class MyUserService {
	public static MyUserService getInstance() {

	return new MyUserService();
}

private static Map<String, User> STORAGE_MAP = new HashMap<String, User>();

public Map<String, User> addUser(User user) {
	Objects.nonNull(user.getUserId());

	STORAGE_MAP.put(user.getUserId(), user);

	return STORAGE_MAP;
	}
}
And our User class code, looks like below;
// User.java

package application.model;

public class User {
	private String userId;
	private String userName;
	private String userMobileNo;

	public String getUserId() {
        	return userId;
	}
	public void setUserId(String userId) {
        	this.userId = userId;
	}
	public String getUserName() {
        	return userName;
	}
	public void setUserName(String userName) {
        	this.userName = userName;
	}
	public String getUserMobileNo() {
        	return userMobileNo;
	}
	public void setUserMobileNo(String userMobileNo) {
        	this.userMobileNo = userMobileNo;
	}
}
Client side web page design
Here, we have three input fields and one submit button. Once you submit the records, it will be stored and will return the whole records. The html file should be created under resources/static directory with the name of index.html since Spring Boot will look for this file by default.
The Html code looks like below;
Ready to Run our Project
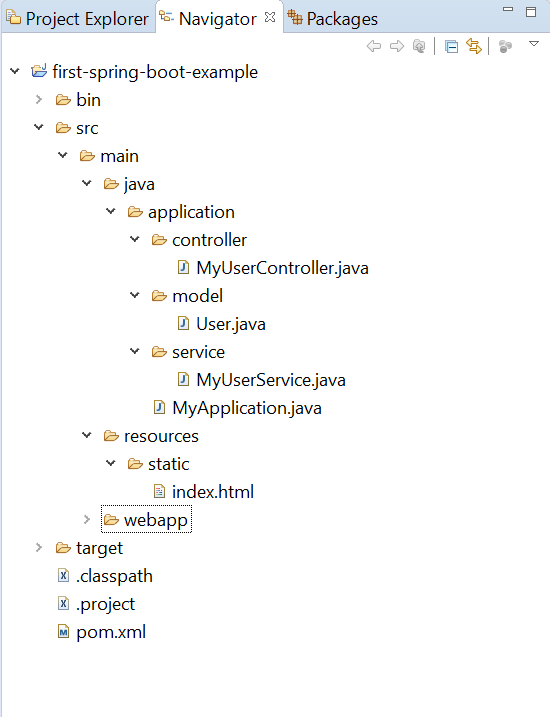
We almost done, everything. Now, ready to run our Project. Follow, the below folder structure; to not to see any issues with the code when you run it from your end;

Run the application by giving below command from the command prompt. Before you run it, navigate to the project directory;
mvn spring-boot:run
If it is successfully executed; you will see our web server is running. Now, go to the web-browser and navigate to the below URL;
and you will see an HTML page; with 3 input fields and a Submit button. After providing the details and pressing the Submit button, our program will execute and returns the results to the web-browser.
That’s a great news. Doesn’t it?
We have successfully created and tested our web application using Spring Boot. You can stop the spring boot application by entering the below command from the command window; or by pressing Ctrl + C also, you can stop the Application.
mvn spring-boot:stop
We will discuss more topics in my upcoming Articles.
One thought on “Spring Boot – Create a web application using Maven – Our First Application”