
Android Studio provides a lot of support to create Android Applications for various Android devices. In this article, I am going to explain the steps to create & build a new Project in Android Studio.
Step 1. Select New Project… menu item from File -> New menu.
OR
Click on “Start a new Android Studio Project” from the “Welcome to Android Studio” window.
Android Studio will open the “Create New Project” wizard window.
Step 2. From the “Create Android Project” wizard:
- Enter the name of the Project in the “Application name” field.
- Enter a domain name in the “Company domain” field. Based on this, the “Package name” field will be populated by combining the Project name given in the “Application name” field.
- Select the folder location where you want to save your project files. The selected folder path will be displayed under the “Project Location” field.
- If you want to include “C++” or “Kotlin” support in the Project, check the “Include C++ support” or “Include Kotlin support” checkboxes respectively. Lets’ not select these for our sample Project.

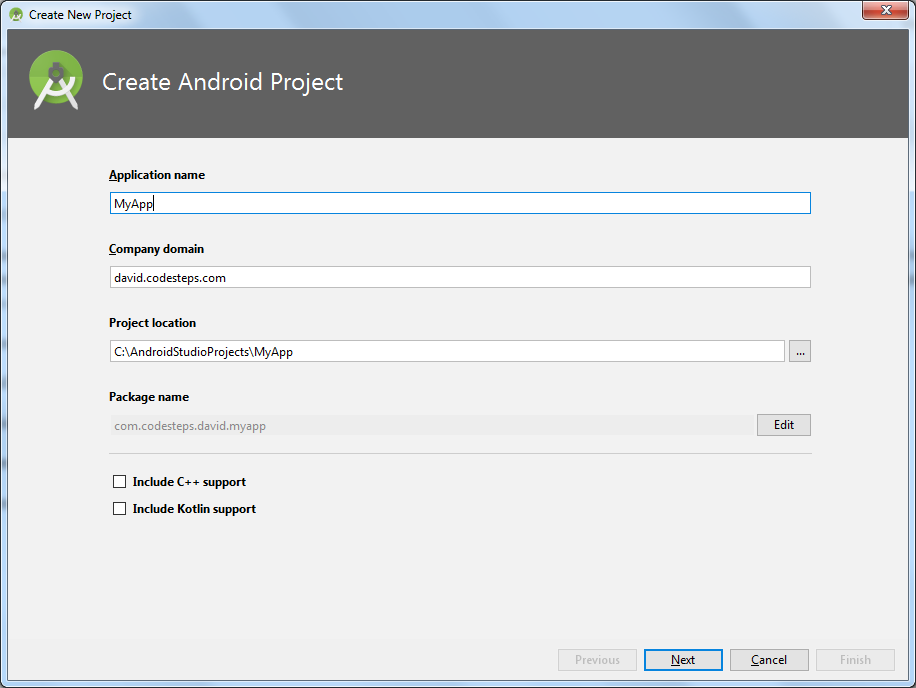
Once done, click on the Next button. Android Studio will open the next wizard window.
Step 3. From the “Target Android Devices” wizard, select the target Android devices for the Project.
- Select the Phone and Tablet checkbox, to target the application to run on Phone and Tablets.
Selecting the Target Android device is an important step. You need to select the target Android Version/API level, from the drop-down box, which is under the Phone and Tablet checkbox. This tells, what Android Version your application is targeting; that means if you want to use advanced features you need to select the latest Android Version/API level. But you are targeting fewer users to use your application.
Usually, the selection is based on this:
- Old Android Version => To target a large number of users, with fewer features.
- New Android Version => More features, but fewer users are your target.
There are other Android devices, we can select, but for our sample Project; lets’ select only the “Phone and Tablet” checkbox; select the latest API level from the drop-down box. Other checkboxes should be unchecked. For this sample project, I have selected “API 28”.
Click on the Next button. Android Studio will open the “Add an Activity to Mobile” wizard.
Step 4. From the “Add an Activity to Mobile” wizard, select Empty Activity and click on the Next button.
Step 5. Android will open the “Configure Activity” wizard, and keep the default values. Click on the Finish button to complete the Project creation.
Android Studio will start Build & syncing the Project. It uses Gradle for the build.
Step 6. If everything goes fine, your build will be Successful. Otherwise, you will see some errors while Building & Syncing the Project.
When I am building the sample Project; it got failed, and Android Studio shows below Error message.
Gradle 'MyApp' project refresh failed
Error: Failed to find Build Tools revision 27.0.3
Install Build Tools 27.0.3 and sync project
>> If your build is successful, you can skip the below steps. You may see the same messages, mentioned in “Step 12“.
Step 7. Would like to verify, what version of the Android SDK Tools version is installed on my system. I checked, and it is Android SDK version “28.0.1” installed.
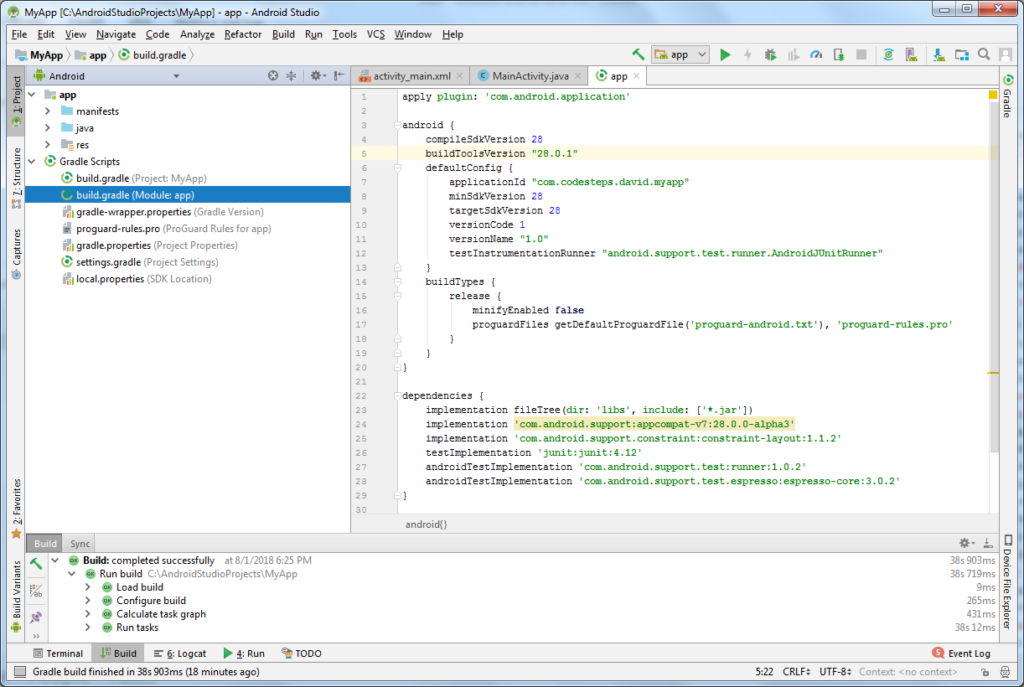
Step 8. Now we tell to Android Studio to use version “28.0.1” instead of looking for the version “27.0.3”. How to tell this.? There is a configuration file “build.gradle” under the Application folder “app”. Open the file & add the below line into the configuration file, under “compileSdkVersion 28” entry.
buildToolsVersion “28.0.1”
The configuration looks like below:
apply plugin: 'com.android.application'

android {
    compileSdkVersion 28
    buildToolsVersion "28.0.1"
    defaultConfig {
        applicationId "com.codesteps.david.myapp"
        minSdkVersion 28
        targetSdkVersion 28
        versionCode 1
        versionName "1.0"
        testInstrumentationRunner "android.support.test.runner.AndroidJUnitRunner"
    }
    buildTypes {
        release {
            minifyEnabled false
            proguardFiles getDefaultProguardFile('proguard-android.txt'), 'proguard-rules.pro'
        }
    }
}
Step 9. Try Again to re-build the Project. It seems, now the above issue is resolved, but I am seeing below new errors.
Unable to resolve dependency for ':app@debug/compileClasspath': Could not resolve com.android.support:appcompat-v7:28.0.0-beta01.
Unable to resolve dependency for ':app@debugAndroidTest/compileClasspath': Could not resolve com.android.support:appcompat-v7:28.0.0-beta01.
Unable to resolve dependency for ':app@debugAndroidTest/compileClasspath': Could not download support-annotations.jar (com.android.support:support-annotations:27.1.1)
Unable to resolve dependency for ':app@debugUnitTest/compileClasspath': Could not resolve com.android.support:appcompat-v7:28.0.0-beta01.
Unable to resolve dependency for ':app@release/compileClasspath': Could not resolve com.android.support:appcompat-v7:28.0.0-beta01.
Unable to resolve dependency for ':app@releaseUnitTest/compileClasspath': Could not resolve com.android.support:appcompat-v7:28.0.0-beta01.
The error clearly says, unable to resolve the dependency “com.android.support:appcompat-v7:28.0.0-beta01”.
It seems either this is not installed on the System, or not placed in the right path where Android Studio looks for dependent files.
Step 10. I verified whether “com.android.support:appcompat-v7:28.0.0-beta01” package is installed on the System. I found this is not installed, but I found another version “appcompat-v7-28.0.0-alpha3” installed. Either I can use the same or download the missing one. Instead of downloading the “beta01” version; I preferred to use the existing “alpha3” version.
How to tell to Android Studio to use this dependency file.?
Step 11. “build.gradle” file contains the configuration to include required dependencies. Again, go back to “build.gradle” file and look for the dependency section. It looks like below:
dependencies {
    implementation fileTree(dir: 'libs', include: ['*.jar'])
    implementation 'com.android.support:appcompat-v7:28.0.0-beta01'
    implementation 'com.android.support.constraint:constraint-layout:1.1.2'
    testImplementation 'junit:junit:4.12'
    androidTestImplementation 'com.android.support.test:runner:1.0.2'
    androidTestImplementation 'com.android.support.test.espresso:espresso-core:3.0.2'
}
I have modified the above red marked entry with the below line, in the “build.gradle” configuration file:
implementation 'com.android.support:appcompat-v7:28.0.0-alpha3'
Step 12. Re-build the Project. And the build & sync was Successfully completed.
Below are messages from the Build window:
Build: completed successfully
  > Run build C:\AndroidStudioProjects\MyApp
    > Load build
    > Configure build
    > Calculate task graph
    > Run tasks
Below are the messages from the Sync window:
MyApp: synced successfully
  > Run build C:\AndroidStudioProjects\MyApp
     > Load build
     > Configure build
     Apply plugin org.gradle.plugins.ide.idea.IdeaPlugin
     Apply plugin org.gradle.plugins.ide.idea.IdeaPlugin
     Resolve files of :classpath
     Resolve files of :classpath
     > allprojects
     Resolve dependencies of :app:debugRuntimeClasspath
     > Resolve files of :app:debugRuntimeClasspath
     Resolve dependencies of :app:debugCompileClasspath
     ...
     ...
     Resolve files of :app:releaseUnitTestCompileClasspath
We have Successfully Built our Project. Now is the time to Run the Project.

I will explain how to Run the Project, in the next Article.
Please feel free to add your comments about the Article.
[..] David
6 thoughts on “Android Studio : Create Android Project”